
最近在研究大模型的量化方向,前期通过fake quant取得了不错的进展,验证了方法的可行性,因此想要考虑实现real fp4 量化,用来测量真实速度。
通过查阅资料发现,目前版本pytorch 2.8.0+cu128 支持的原生nvfp4函数仅有_scaled_mm,接口定义如下
def _scaled_mm(
    self: torch.Tensor,
    mat2: torch.Tensor,
    scale_a: torch.Tensor,
    scale_b: torch.Tensor,
    bias: Optional[torch.Tensor] = None,
    scale_result: Optional[torch.Tensor] = None,
    out_dtype: Optional[torch.dtype] = None,
    use_fast_accum: bool = False
) -> torch.Tensor:解释如下
// V2: Computes matrix multiply + bias while applying scaling to input and output matrices
// Scales are only applicable when matrices are of Float8 type and assumed to be equal to 1.0 by default.
// If output matrix type is 16 or 32-bit type, scale_result is not applied.
// Known limitations:
//  - Only works if mat1 is row-major and mat2 is column-major
//  - Only works if matrices sizes are divisible by 32
//  - If 1-dimensional tensors are used then scale_a should be size = mat1.size(0)
//    and scale_b should have size = to mat2.size(1)
//  Arguments:
//    - `mat1`: the first operand of the matrix multiply, can be type `torch.float8_e4m3fn` or `torch.float8_e5m2`
//    - `mat2`: the second operand of the matrix multiply, can be type `torch.float8_e4m3fn` or `torch.float8_e5m2`
//    - `scale_a`: a tensor with the inverse scale of `mat1`, whose shape/strides/dtype depend on the scaling scheme
//    - `scale_recipe_a`: An integer corresponding to an enum describing the scaling scheme used for `scale_a`
//    - `swizzle_a`: An integer corresponding to a `SwizzleType` enum describing the swizzling scheme for `scale_a`
//    - `scale_b`: a tensor with the inverse scale of `mat2`, whose shape/strides/dtype depend on the scaling scheme
//    - `scale_recipe_b`: An integer corresponding to an enum describing the scaling scheme used for `scale_b`
//    - `swizzle_b`: An integer corresponding to a `SwizzleType` enum describing the swizzling scheme for `scale_b`
//    - `bias`: the bias, can be type `torch.float16` or `torch.bfloat16`
//    - `out_dtype`: the output dtype, can either be a float8 or a higher precision floating point type
//    - `use_fast_accum`: if true, enables fast float8 accumulation. Backends may ignore this option if not applicable.
// - `out`: a reference to the output tensor尽管事实上scaler mm可以进行nvfp4的运算,但是目前scaler mm还未添加nvfp4 的文档,这造成了很多的麻烦。因此基于目前的了解编写此文,希望对读者有所帮助。
nvfp4基本介绍
顾名思义,是nvdia设计的,每4bit为构成的浮点变量。为e2m1的变种,代表其4bit中,有2bit表示指数位(exponent),1bit表示尾数(mantissa),剩下一位为符号位。
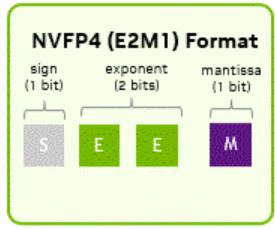
其从小到大,分别可以表示十进制中的
code_book = [-6.0, -4.0, -3.0, -2.0, -1.5, -1.0, -0.5, -0.0, 0.0, 0.5, 1.0, 1.5, 2.0, 3.0, 4.0, 6.0]注意到,该数据范围仅包含从 -6 到 6 的区间,且仅包含16个数字。为了保证进一步的计算精度,根据英伟达的设计,每16个fp4元素都对应了一个fp8 (e4m3)的缩放因子。使其在保证内存减少的前提下,能够保证一定的精度和表示范围。
torch fp4支持
当前版本pytorch 2.8.0+cu128 目前仅有 float4_e2m1fn_x2 这一种存储格式。其格式定义为每个元素占 8bit 其中包含两个float 4 e2m1 元素。该格式并未实现任何函数,无法使用 .to(type) 无法使用 .copy 仅能通过uint8/int8 通过view 方式转换(不做数值转换 仅该表type修饰)。
对于scaler mm的mat1和mat2的传入参数为 float4_e2m1fn_x2 且使用BlackWell架构时,会调用对应tensor core 进行加速。通常的验证方式如下
import torch
import triton
from torch.profiler import profile, ProfilerActivity, record_function

raw = torch.randint(0, 256, (256, 256), device="cuda", dtype=torch.uint8)
a = raw.view(torch.float4_e2m1fn_x2)
raw = torch.randint(0, 256, (256, 256), device="cuda", dtype=torch.uint8)
b = raw.view(torch.float4_e2m1fn_x2).T

ascale = torch.ones((a.numel() // 8, ), device="cuda", dtype=torch.float8_e4m3fn)
bscale = torch.ones((b.numel() // 8, ), device="cuda", dtype=torch.float8_e4m3fn)

def trace_handler(prof):
    # please verify the following print statement prints some thing like
    # "cutlass3x_sm120_bstensorop_s16864gemm_block_scaled_ue4m3xe2m1_ue4m3xe2m1_f32_bf16_bf16_128x128x256_1x1x1_0_tnn_align32_o_vs16_bias_bf16_relu"
    # to ensure that the GPU is indeed using its tensor core's FP4 capability
    print(prof.key_averages().table(
        sort_by="self_cuda_time_total",
        row_limit=200,                 # show more rows
        max_name_column_width=200      # << widen name column
    ))

with profile(activities=[ProfilerActivity.CUDA], record_shapes=True, on_trace_ready=trace_handler) as prof:
    c = torch._scaled_mm(a, b, ascale, bscale, out_dtype=torch.bfloat16)
其中为了调用对应kernel,我们希望传入的scaler是1D array。
torch 并未提供函数在nvfp4格式和正常格式 (e.g. half, fp32)之间进行转换。因此需要自己编写对应的函数进行转换。
转换为 fp4
由于我们要进行正确的运算,且绝大多数输入矩阵均为fp32等较高精度矩阵,因此,我们需要对数据进行转换。转换过程氛围两个阶段,第一步将每16个元素映射到[-6,6]的范围内,并且存储其对应scaler;第二步将映射后的元素再次映射到fp4的范围内。
第一次映射
将原始矩阵平铺,然后将每16个元素分成一组,求出其最大值,存储该值的六分之一作为scaler,然后将对应元素除以该数。此时的scaler正好为我们需要的一维输入。
    # Get flatten data
    x_flat = x.contiguous().view(-1)

    # Get Scale
    x_reshaped = x_flat.view(-1, 16)
    max_abs = x_reshaped.abs().max(dim=1).values + 1e-8
    scale = (max_abs / 6.0)

x_scaled = torch.clamp((x_flat / scale.repeat_interleave(16)), -6, 6)第二次映射
将第一次映射后的元素根据code book value取到值最接近的元素的index即可作为fp4对应的二进制,然后通过位运算,将两个元素合并成同一个。
    codebook = torch.tensor(
        [0.0, 0.5, 1.0, 1.5, 2.0, 3.0, 4.0, 6.0,
         -0.0, -0.5, -1.0, -1.5, -2.0, -3.0, -4.0, -6.0],
        device=x.device
    )


    codebook_idx = torch.argmin((x_scaled.unsqueeze(-1) - codebook).abs(), dim=-1)  # look into the code book
    codebook_idx = codebook_idx.to(torch.uint8)

    # Squeeze to int8
    hi = codebook_idx[0::2]
    lo = codebook_idx[1::2]
    packed = (hi << 4) | lo  # pack two 4-bit values
    packed = packed.contiguous()

quant_tensor = packed.view(H, W // 2).view(torch.float4_e2m1fn_x2) # back to target size此处应当根据具体的二进制值编排code_book,如 0b0000 对应0 因此其为code book 的第一个元素。
调用scaler mm计算?
将计算出来的值传入scaler mm即可得到结果……吗?
我靠,怎么可能。要是真这么简单,我还会写这篇文章?下面是 scaler mm最坑的一点
发现过程
如果你不想看我的唠叨 可以直接跳转到下一个章节
如果你使用刚才的代码进行了实验,你会发现代码确实可以正常运行。但是,计算后的结果和你期望的值有很大的误差。原本我一度以为是fp4计算中引入的误差,但是在测试eye matrix与ramdom matrix相乘后,发现结果相差大的惊人,是任何商业级产品不可接受的程度!通过绘图发现,相较于原始矩阵乘法,该方法获得的计算结果的中间,全部都是0。这让我联想到了scaler的映射关系,通过手动将eyev value的scaler都设置为1,该error消失了,因此判断是sclaer的映射关系出现了问题。经过很长很长很长很长很长很长时间的调试和网络搜索。终于总结出了一下规律。
别问我为啥没用大模型。大模型他干得了这些吗,他干不了,他没这能力你知道吗~
scaler mm scaler映射关系
几个前提假设:
- 输入矩阵为二维矩阵,且大小为64的整数倍(其实也是scaler mm的真实限制)
- scaler输入为一维数组
- 我们称原始矩阵为W[N,K],fp4矩阵为 F[N,K],缩放参数为S[I].
在下面图片中,规定一下内容
- 图片为原始矩阵的形状
- 每个格子代表16个原始元素
- 其上的数字代表scaler的index(格子中16个元素所对应的scaler)
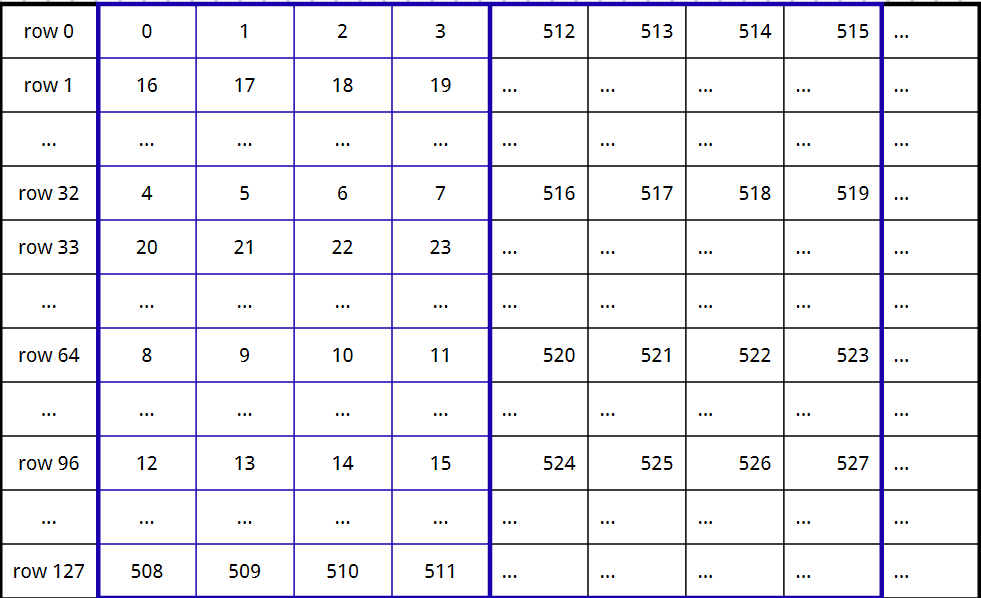
ok,容我用自然语言慢慢解释:
首先,原始矩阵前16个元素对应同一个scaler(nvfp4规定)。即理想情况下 W[0,0:8] =F[0,0:8] * S[0].
然后,该过程在行上重复4次。
接着,跳掉第32行的前16个元素继续该过程,四次。(对应S[4,5,6,7])
接着是第64行,和第96行。
然后跳回第一行,重复该过程(每处理4个scaler就向后跳32行重复4次)。
重复,直到前127行的前 4*16列的元素的scaler都被填满,移动至下4*16列原始元素,重复该过程直到全部列都被填满。
重复移动至下128行 重复该过程,直到全部矩阵都被填满。
如果您想知道我的内心独白 请看下文:
首先,原始矩阵前16个元素对应同一个scaler(nvfp4规定)。即理想情况下 W[0,0:8] =F[0,0:8] * S[0]. (并没有问题)
然后,该过程在行上重复4次。(对应S[1,2,3], 也没有问题)
接着,跳掉第32行的前16个元素继续该过程,四次。(对应S[4,5,6,7])(????)
接着是第64行,和第96行。(ok, fine)
然后跳回第一行,重复该过程(每处理4个scaler就向后跳32行重复4次)。(???)
重复,直到前127行的前 4*16列的元素的scaler都被填满,移动至下4*16列原始元素,重复该过程直到全部列都被填满。(hummm)
重复移动至下128行 重复该过程,直到全部矩阵都被填满。(🤓☝️)
下面是naive 的实现,我先假设将scaler Tensor折叠成二维形状。然后进行一下操作。
# Naive implementation with explicit loops for reference, not used anymore
def flatten_stride16_rows_mod32_groups_of4_naive(x: torch.Tensor) -> torch.Tensor:
    res = torch.zeros_like(x)
    i = 0

    for row_start in range(0, x.shape[0], 128):
        for col_start in range(0, x.shape[1], 4):
            for sub_row_offset in range(32):
                for r in range(0, 128, 32):
                    for c in range(4):
                        row = row_start + sub_row_offset + r
                        col = col_start + c
                        if row < x.shape[0] and col < x.shape[1]:
                            res.view(-1)[i] = x[row, col]
                            i += 1

    return res.view(-1)


# after get scaler vector
    scale = scale.view((H, W//16))
scale = flatten_stride16_rows_mod32_groups_of4(scale)当矩阵增大的时候,该过程十分消耗时间,因此让chat写了一个使用gpu的版本:
def _linear_index_map(h: int, w: int, device) -> torch.Tensor:
    # Row order within a 128-row block: for s in [0..31], for r in [0,32,64,96]
    s = torch.arange(32, device=device)
    r = torch.arange(0, 128, 32, device=device)                  # (4,)
    rows_in_block = (s[:, None] + r[None, :]).reshape(-1)         # (128,)

    # Block bases (row_start): outermost loop
    B = (h + 127) // 128
    row_bases = torch.arange(0, B * 128, 128, device=device)      # (B,)

    # All rows in loop order, grouped by block, then rows_in_block
    rows_BG = row_bases[:, None] + rows_in_block[None, :]         # (B, 128)

    # Column order: for col_start in steps of 4 (group), for c in [0..3]
    G = (w + 3) // 4
    col_bases = torch.arange(0, G * 4, 4, device=device)          # (G,)
    c = torch.arange(4, device=device)                            # (4,)
    cols_G4 = col_bases[:, None] + c[None, :]                     # (G, 4)

    # Build linear indices with broadcasting, matching loop nest:
    # for row_block (B) -> for col_group (G) -> for rows_in_block (128) -> for c (4)
    lin = rows_BG[:, None, :, None] * w + cols_G4[None, :, None, :]  # (B, G, 128, 4)

    # Mask out rows/cols that fall outside the actual HxW
    row_valid = rows_BG[:, None, :, None] < h                      # (B,1,128,1) -> broadcast
    col_valid = cols_G4[None, :, None, :] < w                      # (1,G,1,4)
    valid = row_valid & col_valid

    # Flatten in memory order: c fastest, then rows_in_block, then G, then B (exactly your loops)
    index = torch.masked_select(lin, valid)                        # (h*w,)
    return index.to(torch.long)


def flatten_stride16_rows_mod32_groups_of4(x: torch.Tensor) -> torch.Tensor:
    """
    Vectorized flatten:
      - Loops replaced with a precomputed index map
      - Preserves exact ordering of your original nested loops
      - Runs on GPU if x is on CUDA
    """
    assert x.dim() == 2, "x must be 2D (H, W)"
    H, W = x.shape
    idx = _linear_index_map(H, W, x.device)                       # (H*W,)
    return x.reshape(-1)[idx]                                      # 1D tensor
虽然猜测和cuda kernel内部的布局有关系,但是我还是不理解为什么要这么搞。不过这样确实可以正确计算。
有用的链节:
https://docs.nvidia.com/cuda/cublas/#d-block-scaling-factors-layout
https://docs.nvidia.com/cuda/parallel-thread-execution/#tcgen05-mma-scale-factor-a-layout-1x
Block Scaled Matrix Multiplication — Triton documentation
测试
使用fp4进行矩阵乘法,可以近乎无损的算出对应fp16值,其精度损失主要集中在转换fp4的过程中。将fp4矩阵乘法结果和fp4转换回fp32再进行矩阵乘法的结果相对比,cos 相似度可以达到 99%以上。与原始fp32值进行的矩阵乘法相比 cos 相似度大概在95%以上。
考虑到该过程相比fp32快了将近10x。认为该过程是值得的。
下一步
虽然使用了gpu进行转换,该过程仍然耗时,因此考虑使用cuda kernel进行进一步的实现。
如果需要,可以通过github开源。